If you’ve seen any of my previous posts here, you may have noticed that I enjoy woodworking. I’m also very sentimental, so I save our Christmas trees after we take them down, dry them, strip the branches, and keep the trunks for future projects. I think it’s nice to have that bit of story behind something you make.
(I don’t know what the slrpnk.net opinion on Christmas trees is. Around where I live, when a farm or orchard goes out of business, developers turn it into another subdivision. A tree farm might not be an ideal environment, but I’m willing to bet on it being better than another clearcut, paved, human neighborhood. So for us, we figure we can give some money to the Boys and Girls Club, help keep a farm solvent, and then use the wood for projects.)
I use them for small items mostly – I’ve got a set of lathe projects I plan to show off next, but for the moment, I’m going to focus on the little carvings I’ve been doing.
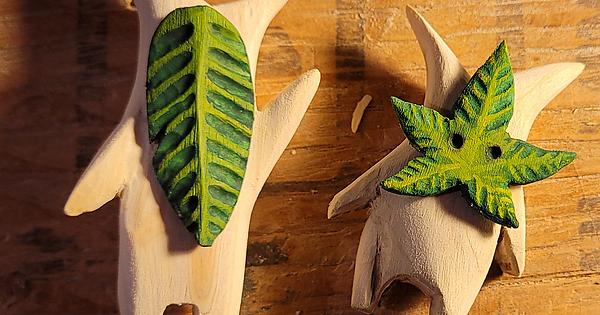
My wife loves the new zelda games, especially searching for koroks. (Koroks are little forest spirits that live in the game and hide all over the game map. Finding them can be as simple as picking up a rock or more complicated, doing timed challenges or figuring out a mild puzzle.) She shares the Nintendo Switch with my brother- and sister-in-law though, so I hide these little guys around our apartment for her to find when she can’t play.
Like I said, the wood comes from our Christmas trees and the paint I use for their leaves is 15-year-old acrylics from back when I played warhammer. Electricity and time spent, but no new materials.
I start by using the bandsaw to cut a section of tree trunk from the Christmas tree. I use the belt sander to flatten one side, then use the band saw to square it up a bit, similar to ripping full-size tree trunks into dimensional boards on a sawmill (I don’t like to lose too much material, but you need at least a couple flat sides to safely rip the piece lengthwise and so you can draw on one side and still lay it flat while you cut it out.
After I cut them out, I rough them into shape with the belt sander and a boxcutter, then a dremel.
Before sanding, I like to paint the mask. This gives it plenty of time to dry (so I can come back and make adjustments) while I sand the main body. I’m not as good at painting as I was when I was a kid, but I can still do a bit of detail work when I have to.
Then I do lot of sanding with sandpaper. I like to read a ebook while I sand out any blemishes.
I drill through the mask for the branch/nose (if there is one), and use the same dab of glue to attach the nose as to fasten the mask to the korok. After I glue the mask on, I set them on a bench outside to dry - I remember super glue fogging my warhammer minis, and airflow is supposed to help.
One of the really things I love about woodcarving is the way the wood comes with constraints that can shape the final piece. You have to adjust your plans as you find quirks and irregularities in the material, or as you damage it or make mistakes. It feels a bit like a collaboration between you and your work. I generally really like working around constraints.
You can usually find two koroks in each three-inch piece of tree trunk, but it depends on the size of the koroks you’re looking for. Sometimes it turns out there isn’t a korok in a piece of wood. Sometimes there’s just a mask.
These are fun, and quick to make - at this point, they usually go from a chunk of tree to a finished, painted carving in about 4 hours. I could probably take more time and put more detail into them, but to be honest, making sure there’s a lot of them to find was a higher priority for me than sanding out every blemish or making the leaf as thin as possible in pine.
At this point, I’ve almost used up our 2020 tree. Its branches have been useful when I need wooden pegs, and now that I have a lathe to work with, the already-round, dried wood is useful for that. Luckily I have a few more to work with.


I hope it helps! I’m always happy to talk woodworking too